SOCIAL MEDIA

Wednesday 20 March 2019

Super Simple Homemade Play Dough: Only 5 ingredients that you already have in the pantry!

This recipe has been around these parts for a few years now, I already wrote a blog post about it - (Click Here) way back in 2015.

Since it's been a while, I thought I would write down my updated recipe and list some ways for you to customize it in your home.

It's honestly SO simple, the homemade version can be whipped up in minutes and stored in the fridge for a few days.

Plus you can play around with making your own colours OR add no colour at all and use it as is, moldable sand!
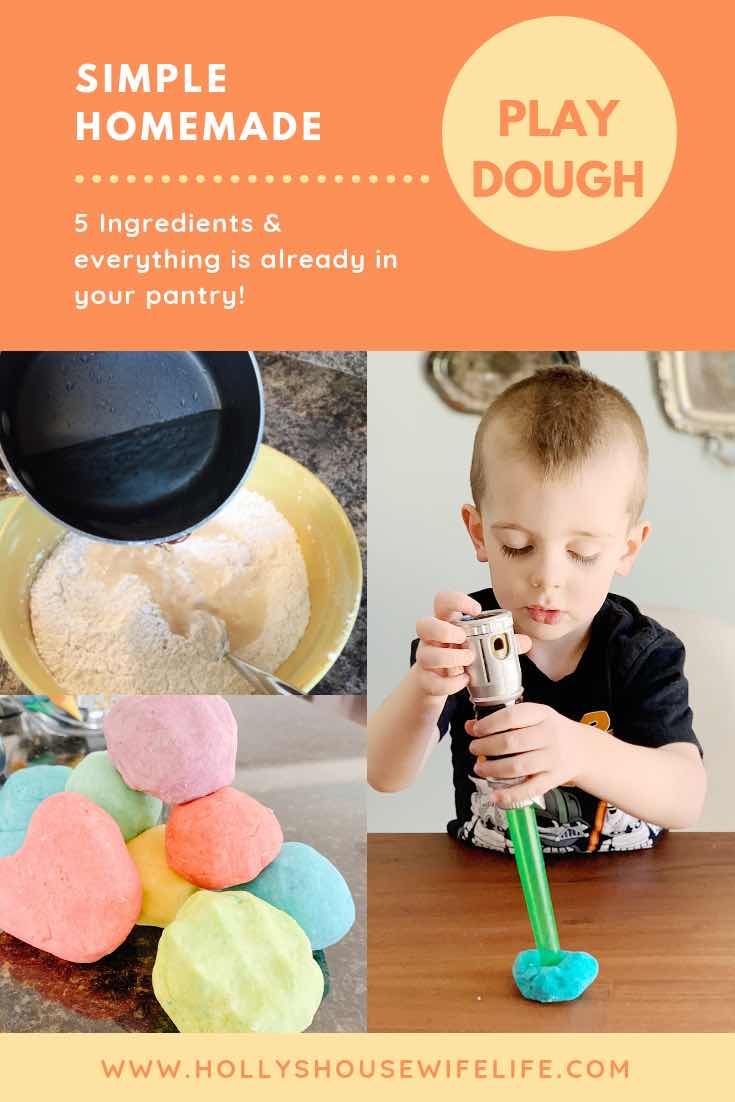


HOMEMADE PLAYDOUGH

 
- 2 Cups Flour
 
- 1/2 Cup Salt (I used Kosher salt in the updated photos because that's all I had in the pantry! Worked great!)
 
- 1 1/2 Cups Water
 
- 2 Tablespoons Vegetable Oil
 
- Colour Agent (I use food colouring, especially NEON! see below) 


Instructions:
 
Mix flour and salt together in a bowl. 
 
Mix the vegetable oil and water in a pot on the stove, bring to a rolling boil. 
 
Slowly mix your boiling water/oil into the dry ingredient bowl.
 
Continue mixing the oil/water into the dry ingredients until it forms a dough consistency (I use all the oil/water mixture).

Flour counter top and knead dough smooth.

Divide dough into as many balls as you have colours.

Have fun making custom colours!

Add scent if you desire.

I considered adding a bit of vanilla for a nice aroma, or kid-friendly essential oils  


I like to keep plastic table cloths from the Dollarama on hand for these messy floor activities, they're larger than a cut garbage bag and if you shake them outside you can usually use them through a few painting/playdough adventures. 


Notes about how to colour your playdough:
Feel free to adapt this!

Use Koolaid packets!

 Or natural dye from veggies/spices (beets, turmeric, cabbage, strawberries) by boiling the veggie for 10 minutes and then simmering for 10-30 minutes until you get desired colour.

If you use the veggie way of colouring replace tap water (in the recipe above) with the veggie dyed water and work your dough one colour at a time.

If you use food colouring try to fold your dough as thick as possible to avoid getting dye on your hands.

Once it's worked into the dough it's fine to give to the kids, it doesn't leave any colour residue beyond regular playdough stickiness!


Throwback photos of Baby Elli!


Current photos of my boy!


We got a solid 30 minutes of silence while these two were playing!
I give them some measuring cups and spatulas and send them on their way.


Honestly, I played too!
It's a very calming activity to roll and shape the dough.

This was second-day dough and I added a bit of fresh flour to the balls if they felt at all damp but overall they hold up wonderfully in an airtight container stored in the fridge.


Hover over photo and PIN ME! >


Saturday 2 March 2019

My DIY Dresser: Super Affordable Glass Knobs and Drawer Pulls off Amazon


I'm going to start off by right away giving you the links to this hardware!


Click the link above for the glass drawer pulls, they're 5 for $25.43 (I ordered two sets, 10 pulls total because I needed 9).

They're available for 2-day shipping if you're a prime member, I've been a prime member for 1.5 years and I cannot rave about it enough! I use Amazon TV (like Netflix but different shows) and Amazon music (daily), plus I order a ton of little things off of Amazon itself which always has free 2-day shipping! (Some items are not available for free 2-day shipping but I've never found a product I couldn't substitute for something else that has the free shipping!)


Click above for the knobs!
These are not glass but they're only $13.99 for 12 (!!!) and they're really lovely quality, very sparkly/shiny.

I ordered these all the way back in December and they were also free 2-day shipping.
After visiting hardware stores and specialty knob and pull stores, I am so pleased with my Amazon orders!

They're by far the most affordable I could find and the quality is beyond what I expected!

The links above are affiliate links so if you want to order either I would appreciate if you buy right after you click on my link because I'll get a tiny commission, all of last year I think I was paid out $15 in total (lol) so its barely worth me linking but hey, I'm recommending them anyway, I may as well! ;)


Now onto the makeover!


I spotted this dresser during the Halifax curbside giveaway week, I always participate in these weeks and I ALWAYS drive around picking up. (much to Nicks dismay LOL)

As soon as I saw this dresser I saw its potential!
Notice how clean inside the dresser drawers are, call me boujee but I always take note of the house things are coming from. You still get to be choosey with giveaway items, just because something is free doesn't mean I don't care if your cats been using it as a litter box for 6 months.

Just take a quick peek inside of drawers and circle round the item, make sure its in solid condition.

I love a project, I don't mind putting a little work into an item, I actually love owning 1 of a kind pieces! Sometimes my projects can end up costing half of what something new would cost and a person who doesn't enjoy DIY may ask "why put in all that effort?!"

But isn't it satisfying to have something to work on?? You're the only person with that particular item, maybe in the world! It's like a special little piece that has also helped the earth by being reused instead of going into a landfill.

So much of what we get rid of these days still has life and purpose in it, it just needs a new home and maybe a little TLC. 


You know I've been on a tv stand rampage lately (fireplace debacle!) and I'm trying to declutter the tv stand scene. This has not been easy because we do have a lot of things that need to be displayed, cable boxes, Xboxes, yes, that's a VCR (hehe). I love the idea of clean areas since this is a major cat hair, dust collector but we also have to be practical!

I thought the dresser would be a perfect compromise, Nick would get to store some of his clothes in our room and we would just keep the essentials on top of the dresser (eventually wall mounting this tv too!)


We picked it up way back in October so we were able to keep it outside for the day and sand it, then we went straight in with one of my favourite paint.

I have three wood items in our bedroom painted with this,  2 side tables and the dresser.
I also have a massive armour in Noelles room that's been painted the same.

See the makeovers in this old blog post 2017! CLICK


I would say you can get this paint at almost any hardware store, I always pick mine up at Kent.
It claims one coat and no primer needed but that's not been the case for me.
I'm very fussy, I've never used a primer but I definitely do 2 if not 3 coats for a nice opaque look!

It's priced around $30, which isn't cheap but it will last you through a couple of projects!

I like to roll it on with a mini roller and have a brush on hand to get into corners and creases.


These are some throw backs of the other pieces I've painted, you can see the before and afters in the old blog post I've linked above.


Back to the handles!
They were the perfect fit, they are your typical or average sized handle when it comes to spacing for screws.

The last thing I wanted to do was fill in holes and have to make a new placement for where the handles go. This actually held me up for a minute because there were some other handles on Amazon I really liked but they wouldn't fit where the old handles fit, so I debated what to do.


In the end, I am so happy with this project!
Nick loves it!

He put the handles on in ten minutes flat, they're nice and sturdy, they look fantastic.

The whole project must've cost me just around $100 start to finish (even with getting the dresser for free!)

$65 on hardware
$30 on paint
I always have some brushes and rollers on hand so I hardly ever count that value while working on a project but if you don't own them, add that cost in as well.

But, dressers are expensive man!


I just priced some dressers at IKEA and you're going to pay anywhere from $100-400 easily, plus you know what a challenge putting together IKEA furniture is!

You will probably put more effort into an IKEA piece than what I've put into this and you'll have a copy cat of what everyone else has.

Springtime curbside give away will be coming up (usually May) so keep an ear open and maybe get a one of a kind DIY dresser for yourself!

For FREE, lol, the lie I always tell Nick whenever we pick something up. It's FREE.
Don't mention the cost of DIYing ;)